Android-用户界面View-ExpandableListView和ExpandableListActivity
jerry Android 2015年11月23日
收藏
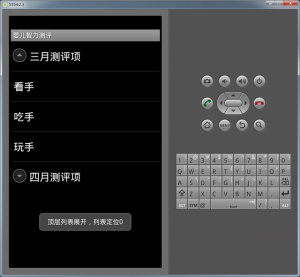
ExpandableListView的效果很实用,配置时有那么一点啰嗦,也容易出错,我在这里例子里会尽量去掉所有干扰信息,好让大家使用时容易借鉴。好我们先看一下运行效果:

点击一级列表,展开下一级:
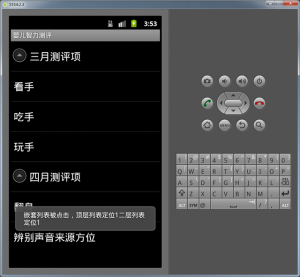
点击二层列表(嵌套的列表)的某一项:
下面我们来看代码:
1、新建一个项目 Lesson43_ExpandableListView
2、main.xml 的内容如下:
<?xml version="1.0" encoding="utf-8"?>
<linearlayout android:layout_height="fill_parent" android:layout_width="fill_parent" android:orientation="vertical" xmlns:android="http://schemas.android.com/apk/res/android">
	<expandablelistview android:layout_height="wrap_content" android:layout_width="match_parent" android:id="@id/android:list">
	</expandablelistview>
</linearlayout>
请注意ExpandableListView标签中id的写法是固定的@id/android:list,因为我们这里用的是 ExpandableListActivity,而ExpandableListActivity代码里写死了要寻找的UI元素是它,这和我们以前讲的很多特殊的Activity是一样的,这里再稍作提醒。
package basic.android.lesson43;

import java.util.ArrayList;
import java.util.HashMap;
import java.util.List;
import java.util.Map;

import android.app.ExpandableListActivity;
import android.os.Bundle;
import android.view.View;
import android.widget.ExpandableListView;
import android.widget.SimpleExpandableListAdapter;
import android.widget.Toast;

public class MainActivity extends ExpandableListActivity {

	@Override
	public void onCreate(Bundle savedInstanceState) {
		super.onCreate(savedInstanceState);
		setContentView(R.layout.main);

		// 准备顶层列表数据
		List
<map string=""><string ,="">> topList = new ArrayList</string></map>
<map string=""><string ,="">>();

		Map</string><string string="" ,=""> topMap1 = new HashMap</string><string string="" ,="">();
		Map</string><string string="" ,=""> topMap2 = new HashMap</string><string string="" ,="">();
		topMap1.put("month", "三月测评项");
		topMap2.put("month", "四月测评项");
		topList.add(topMap1);
		topList.add(topMap2);

		// 准备二层列表数据
		List
<list string="">
</list></string></map><map><string ,="">>> nestList = new ArrayList</string></map>

<list string="">
<map><string ,="">>>();

		// 准备二层列表第一个子列表数据
		List
</string></map><map string=""><string ,="">> nestList1 = new ArrayList</string></map>
<map string=""><string ,="">>();
		Map</string><string string="" ,=""> nestMap1 = new HashMap</string><string string="" ,="">();
		Map</string><string string="" ,=""> nestMap2 = new HashMap</string><string string="" ,="">();
		Map</string><string string="" ,=""> nestMap3 = new HashMap</string><string string="" ,="">();
		nestMap1.put("test", "看手");
		nestMap2.put("test", "吃手");
		nestMap3.put("test", "玩手");
		nestList1.add(nestMap1);
		nestList1.add(nestMap2);
		nestList1.add(nestMap3);

		// 准备二层列表第二个子列表数据
		List
</string></map><map string=""><string ,="">> nestList2 = new ArrayList</string></map>
<map string=""><string ,="">>();
		Map</string><string string="" ,=""> nestMap4 = new HashMap</string><string string="" ,="">();
		Map</string><string string="" ,=""> nestMap5 = new HashMap</string><string string="" ,="">();
		nestMap4.put("test", "翻身");
		nestMap5.put("test", "辨别声音来源方位");
		nestList2.add(nestMap4);
		nestList2.add(nestMap5);

		// 把子列表数据放入
		nestList.add(nestList1);
		nestList.add(nestList2);

		// 准备数据匹配器
		SimpleExpandableListAdapter adapter = new SimpleExpandableListAdapter(
				this, //1.上下文
				topList, //2.顶层数据列表
				android.R.layout.simple_expandable_list_item_1, // 3.一层显示样式
				new String[]{"month"}, //4.顶层map的键
				new int[]{android.R.id.text1}, // 5.顶层数据显示的View ID
				nestList, //6.二层数据列表
				android.R.layout.simple_list_item_1, //7.二层显示样式
				new String[]{"test"}, //8.二层map的键
				new int[]{android.R.id.text1} //9.二层数据显示的View ID
				);

		//设置数据匹配器
		this.setListAdapter(adapter);

	}

	@Override
	public boolean onChildClick(ExpandableListView parent, View v, int groupPosition, int childPosition, long id) {
		Toast.makeText(this, "嵌套列表被点击,顶层列表定位"+groupPosition+"二层列表定位"+childPosition, Toast.LENGTH_LONG).show();
		return super.onChildClick(parent, v, groupPosition, childPosition, id);
	}

	@Override
	public void onGroupCollapse(int groupPosition) {
		Toast.makeText(this, "顶层列表收缩,列表定位"+groupPosition, Toast.LENGTH_LONG).show();
		super.onGroupCollapse(groupPosition);
	}

	@Override
	public void onGroupExpand(int groupPosition) {
		Toast.makeText(this, "顶层列表展开,列表定位"+groupPosition, Toast.LENGTH_LONG).show();
		super.onGroupExpand(groupPosition);
	}

}
</string></map>

</list>
4、编译并运行程序即可看到上面的效果。
推荐文章


")


